PMS Setup BETA
BETA
Setting Up PMS Integration BETA
The setup wizard guides you through connecting your PMS and configuring how resident data is synchronized. The wizard consists of six steps: Connect, Units, Access, Residents, Settings, and Review (the final step page is titled “Finish import”).
Step 1: Connecting to Your PMS BETA
The first step in PMS Integration setup is connecting Zentra to your Property Management System using API credentials. This section covers entering credentials, validating the connection, and troubleshooting common errors.
Procedure
- Navigate toSettingsby clicking the gear icon in the lower left of the screen.
- Click thePMS Integrationstab.
- ClickConnecton the RealPage or Yardi integration card, matching your PMS provider.
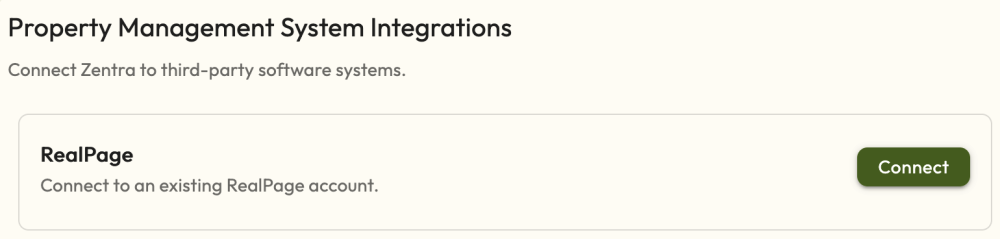
- If you clickedConnecton the RealPage integration card, enter your credentials:PMC ID– Your Property Management Company identifier
- Site ID– Your specific property identifier
- If you clickedConnecton the Yardi integration card, enter your credentials:Property ID– Your Yardi property identifier
- Username– Your Yardi interface username
- Password– Your Yardi interface password
- URL– Your Yardi Voyager URL. Click the help icon for the expected format, for example https://www.yardipcv.com/e35ce116d27f
- Server Name– Your Yardi database server name (always the same value as Database)
- Database– Your Yardi database name
- ClickConnect.
The system validates the connection to your PMS. This may take a few seconds.
If Validation Succeeds
A “Connected” message appears and the wizard automatically proceeds to Unit Matching.
If Validation Fails
An error message displays the specific issue. Common errors include:
Error | Cause | Solution |
|---|---|---|
Failed to connect | Incorrect PMC ID or Site ID (RealPage) or incorrect credentials (Yardi) | Verify credentials in your PMS portal |
Property not found | Site ID or Property ID does not exist | Check the ID matches your property |
Connection timeout | Network issue | Check internet connection and retry |
Access denied | Integration not activated | Activate integration in RealPage Developer site (RealPage) or verify interface user privileges in Voyager (Yardi) |
Your API credentials are stored securely and encrypted. Only users with the TenantSettingsModify permission can view or modify these credentials.
RealPage-Specific Notes
For RealPage connections:
- Credentials are obtained through the RealPage Exchange marketplace
- You must subscribe to “Gatewise incorporated” and activate the integration
- The API returns the exact error from RealPage, helping identify the issue
Yardi-Specific Notes
For Yardi connections:
- Credentials are configured in Yardi Voyager under theGatewise Community Accessvendor. See Prerequisites and Requirements for the full Voyager setup steps.
- Yardi requires six credential fields per property because each Yardi connection uses per-property, per-tenant credentials
- The API returns the exact error from Yardi, helping identify the issue
After Connection
Once connected, the system retrieves your unit list from the PMS. This data is used in the next step to match units to Zentra Devices.
Step 2: Unit Matching BETA
Unit matching links each PMS unit to its corresponding Zentra Device. This matching determines which doors a resident can access based on their unit assignment in the PMS.
Understanding Unit Matching
When a resident is assigned to a unit in your PMS, Zentra uses the unit matching to determine which Device they should have access to. Each PMS unit must be matched to exactly one Zentra Device.
Procedure
After validating your PMS connection, the Unit Matching screen displays:
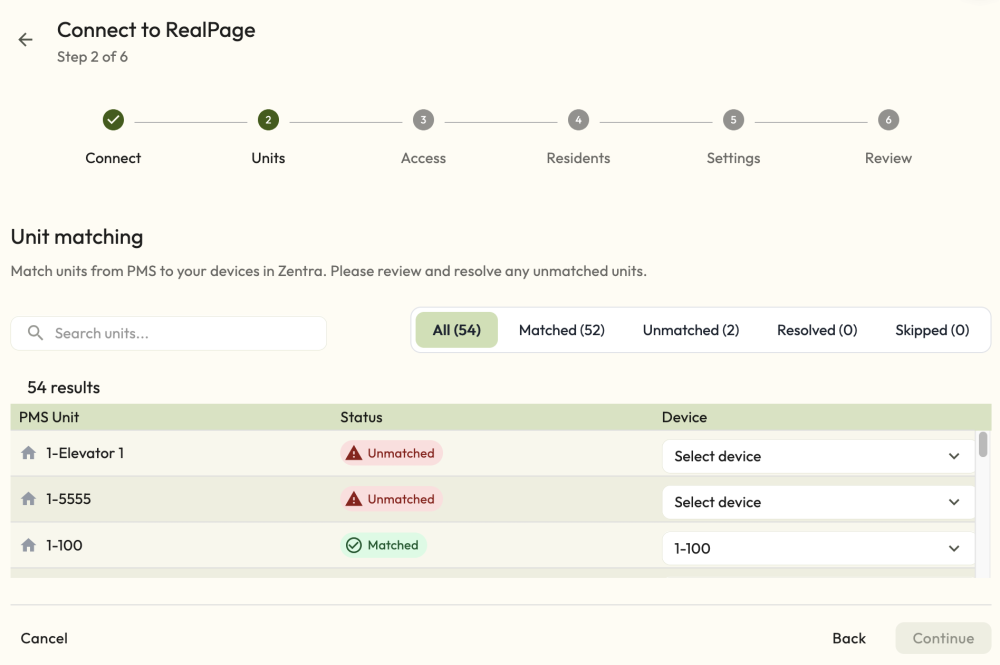
- Review the list of units from your PMS (left column).
- For each unit, select the corresponding Zentra Device from the dropdown (right column).
- If a unit should not be matched (such as elevators or common areas in the PMS data), selectSkipfrom the dropdown.
- ClickContinuewhen all units are matched.
If your Zentra Device names match your PMS unit names, many matches may be auto-suggested. Review these suggestions before continuing.
Matching Options
Option | When to Use |
|---|---|
Select Device | Match the PMS unit to a specific Zentra door/lock |
Skip | The PMS item is not a residential unit (elevator, amenity, etc.) |
Continue Button
The
Continue
button is not active until every PMS unit has either:- A Zentra Device selected, or
- TheSkipoption selected
This ensures no units are accidentally left unmatched.
Unit matching is strictly one-to-one: each PMS unit matches to exactly one Zentra Device, and each Device can only be matched to one PMS unit. There is no built-in way to match a single PMS unit to multiple Devices (for example, a unit with a front door and a separate patio door). For multi-door units, match the unit to one Device here, then use a User Group to grant residents access to the additional door(s) – see the Modifying Unit Matches section of Sync queue & Lifecycle for details. If you need to change a match, first unmatch the Device from its current unit.
After Matching
Once all units are matched, the system stores these matches permanently. When residents are synced, their unit assignment in the PMS determines which Device they receive access to.
Step 3: Access Assignment BETA
Access assignment determines what access new residents automatically receive when they are synced from your PMS. This includes their unit access plus any common areas, amenities, or perimeter access.
Access Configuration Options
Default access has one required, always-applied base configuration and one optional addition:
Option 1: Uniform Access
Select this option if all residents receive the same perimeter, amenity, and common area access regardless of their unit.
Best for:
Properties where amenities are available to all residents equally.Option 2: Customize by Unit
Select this option if different units have different access privileges (for example, different buildings have access to different amenities).
Best for:
Properties with multiple buildings, tiered amenity access, or unit-specific restrictions.Procedure: Uniform Access
- Select“Grant all residents access to”and choose the User Groups.
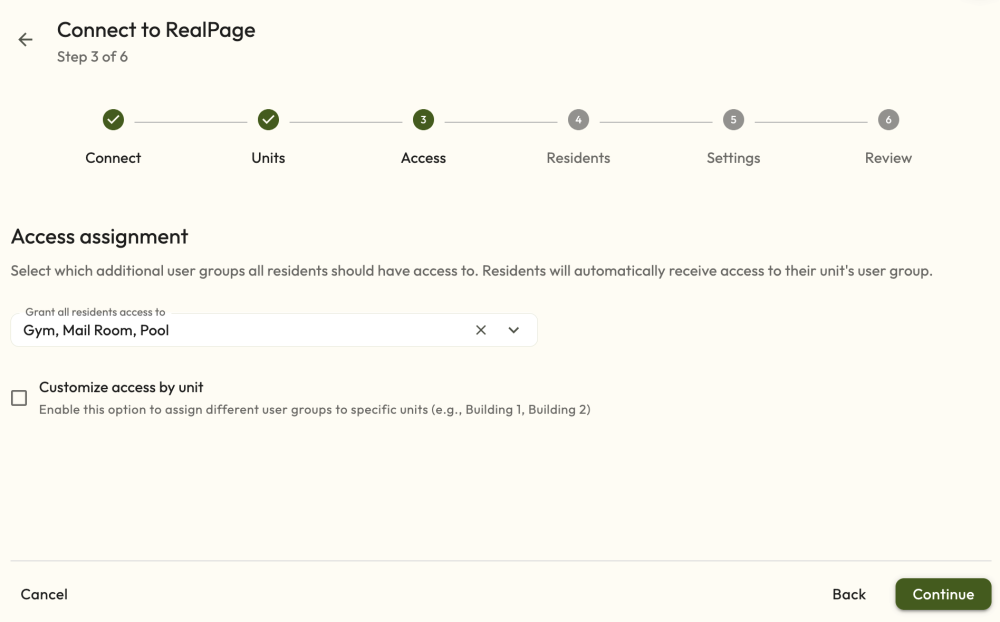
- Select the User Groups that all residents should receive: Common areas (lobbies, mailrooms)
- Amenities (gym, pool, clubhouse)
- Perimeter access (gates, parking)
- ClickContinue.
All new residents synced from the PMS will automatically be assigned to these User Groups.
Procedure: Customize by Unit
- Complete the“Grant all residents access to”selection above – these User Groups still apply to every resident, even with unit customization enabled.
- Check the“Customize access by unit”checkbox to reveal the per-unit table.
- For each unit, select any additional User Groups that unit’s residents should receive, on top of the groups selected above.
- To apply the same additional groups to several units at once, select their checkboxes in the table, choose the groups from theSelect groupsdropdown that appears, and clickApply.
- ClickContinue.
You can always modify a resident’s User Groups after they are imported. The default access configuration only applies to new imports.
User Groups and PMS
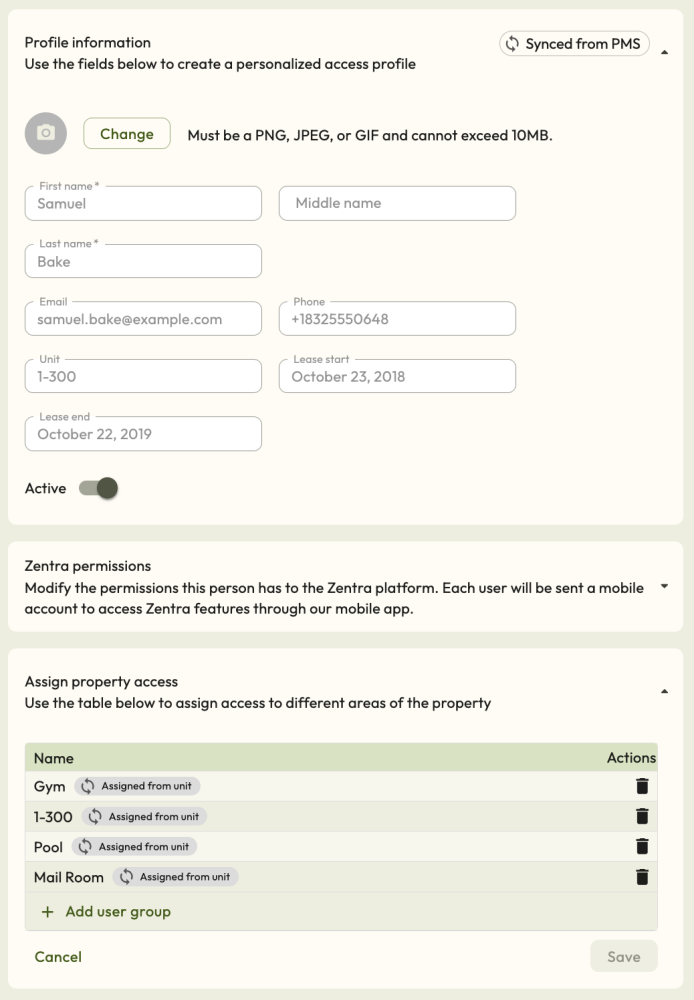
When a resident is synced from the PMS, their User Groups are assigned based on your access configuration. In the resident’s profile, these User Groups display a badge indicating
“Assigned from unit”
.
You can still modify User Groups for individual residents after import:
- Add additional User Groups as needed
- Remove User Groups if access should be restricted
- The tooltip helps identify which groups were auto-assigned
What Happens If No Access Is Selected
If you do not select any User Groups during setup, residents will be created but will have no access until you manually assign User Groups. A warning message displays if you attempt to continue without selecting access.
Residents without User Groups cannot access any doors. Ensure you configure appropriate default access during setup.
Changing Default Access Later
You can modify the default access configuration after setup:
Changing default access requires the TenantSettingsModify permission. A user with only view-level settings access can open the PMS Integrations tab, but the Settings button is disabled, so this procedure is not available to them.
- Navigate toSettingsby clicking the gear icon in the lower left of the screen.
- Click thePMS Integrationstab.
- ClickSettings.
- Update the default access configuration.
- ClickSave.
Changes only apply to future syncs. Existing residents are not affected.
Step 4: Resident Matching BETA
When your Zentra site has existing residents, the setup wizard includes a Resident Matching step. This allows you to link PMS residents to existing Zentra users to prevent duplicates.
This step only appears if existing residents are found in Zentra. For new properties with no residents, the wizard skips directly from Access Assignment to Settings.
Understanding Match Types
The system attempts to automatically match PMS residents to existing Zentra users:
Status | Indicator | Meaning |
|---|---|---|
Auto-matched | Green | High confidence match (email matches) – no action needed |
Needs review | Orange | Low confidence match (name only) – review required |
Resolved | Green | You have confirmed or rejected the match |
Procedure
- Review the list of PMS residents and their suggested matches.
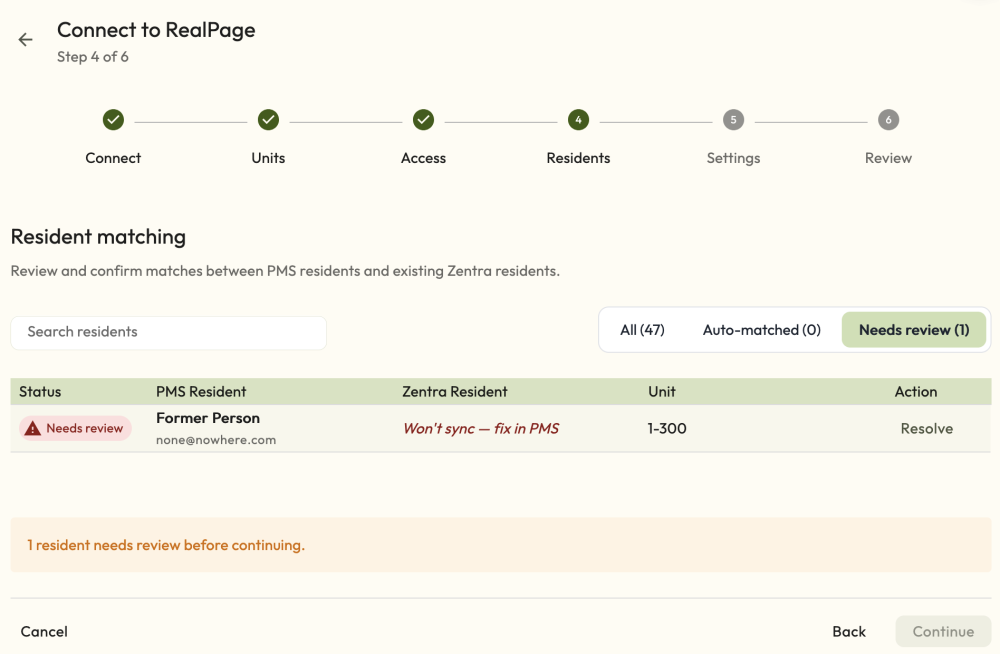
- Use the filter tabs to focus on specific match types:All– View all residents
- Auto-matched– High confidence matches (can proceed without review)
- Needs review– Require your decision
- For each item marked “Needs review,” clickRevieworResolve.
- In the resolution modal, choose an action:Match to existing resident– Link to the suggested or a different Zentra user
- Create as new resident– Import as a new user (does not link to existing)
- Skip this resident– Do not import during initial setup; the record may reappear in the Sync queue on a future sync
- Skip permanently– Do not import now or on any future sync
- ClickResolveto confirm your choice.
- Once all required items are resolved, clickContinue.
Resolution Modal
When you click
Review
on a resident, a modal displays:- Left side: PMS resident details (name, email, unit)
- Right side: Suggested Zentra resident details
Match to Existing Resident
Select this when the PMS resident IS the same person as a Zentra user.
- Use the search dropdown to find and select the correct Zentra user
- The suggestion may not always be correct – verify before confirming
Create as New Resident
Select this when the PMS resident is NOT the same as any existing Zentra user.
- A new resident profile will be created
- The existing Zentra user remains unchanged
If the PMS resident has the same email as an existing Zentra user, you cannot create a new resident. You must either match to the existing user, skip, or skip permanently.
Skip This Resident
Select this to exclude the resident from the initial import.
- They will not be imported during setup
- They may appear in future syncs
Skip Permanently
Select this to exclude the resident from the initial import and every future sync.
- The resident moves to the Permanently Skipped Residents list
- They will not reappear in the Sync queue on later syncs
- You can un-skip a permanently skipped resident later if you change your mind – see Sync queue
Auto-Matched Residents
Residents marked “Auto-matched” have high confidence matches (typically email address matches). These do not require review – the wizard will automatically link them when you proceed.
You can still click
Review
on auto-matched residents if you want to verify or change the match.Continuing Without Resolving All
You must resolve all “Needs review” items before the
Continue
button becomes active. Auto-matched items do not require action.Step 5: Integration Settings BETA
The Settings step configures credential types, data synchronization behavior, and the automatic sync schedule. These settings control how Zentra handles incoming PMS data.
Credential Types
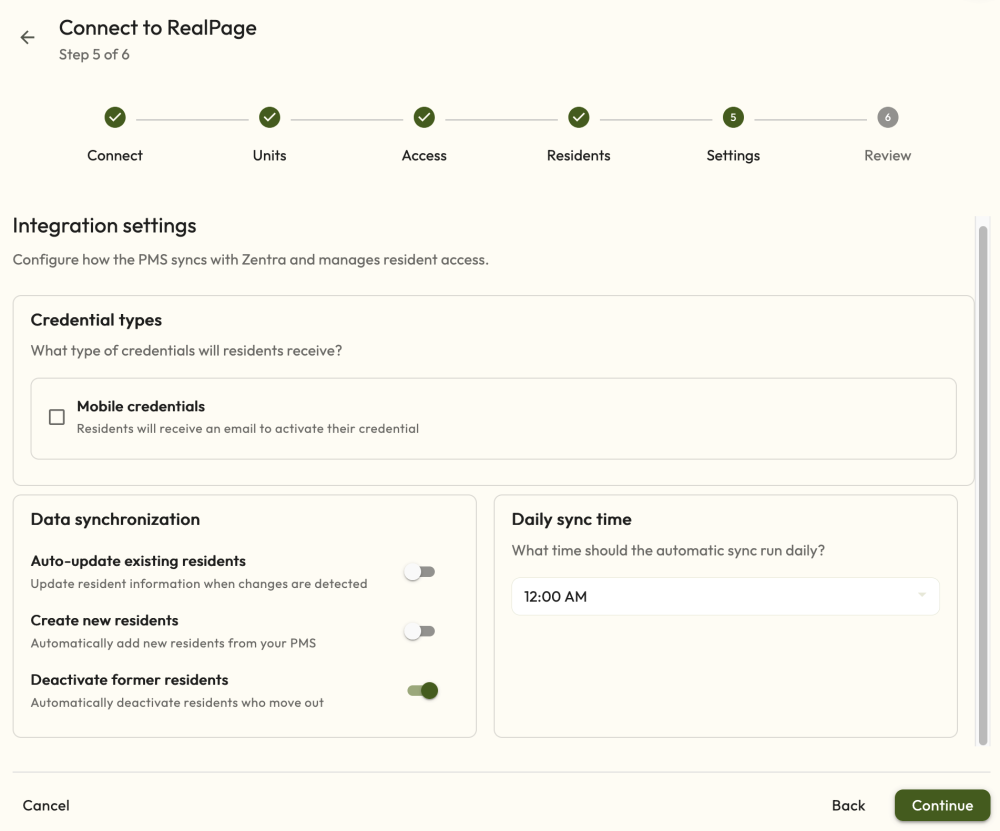
Select which credential types to offer for new residents:
Mobile Credentials
- Enabled– New residents receive a welcome email with instructions to set up mobile access
- Disabled– Residents are created without mobile credentials (can be added later)
When mobile credentials are enabled, residents will receive an invitation email to create a Zentra account on their lease start date at the configured daily sync time. It is recommended that you set the daily sync time based on your preference for when access should be made available to the incoming resident.
Data Synchronization
Configure how changes from your PMS are handled automatically:
Auto-Update Existing Residents
- Enabled (default)– When resident data changes in your PMS (name, email, phone, unit), the changes are automatically applied in Zentra
- Disabled– Changes are routed to the Sync queue for manual review
Create New Residents
- Enabled (default)– New residents from your PMS are automatically created in Zentra
- Disabled– New residents are routed to the Sync queue for manual review
Deactivate Former Residents
- Enabled (default)– Residents who move out are automatically deactivated in Zentra when their status changes in the PMS
- Disabled– Move-outs are routed to the Sync queue; a property manager must review and apply them manually
These settings are enabled by default for smooth operations. During initial setup, you can disable options to review all PMS data manually before residents are created. Once you’re confident the data is correct, keep these enabled for ongoing operations.
When “Create New Residents,” “Auto-Update Existing Residents,” or “Deactivate Former Residents” are disabled, the corresponding changes remain in the Sync queue for your review. You must review and apply changes manually, or re-enable automatic processing.
Daily Sync Time
Configure when the automatic sync runs:
- Select the time of day for automatic sync from the dropdown.
- The time is based on your property’s local timezone.
Recommended:
If mobile credentials are enabled, select a daily sync time when new residents should be able to access the property. If initial rent will always be collected ahead of time, open business hours can make sense. To guarantee money changes hands prior to access, end of business hours could make more sense, especially because the invitation can be sent on-demand once the account is current.Procedure
- Configure credential type preferences.
- Set data synchronization toggles based on your review preferences.
- Select the daily sync time.
- ClickContinueto proceed to the Finish import step.
Step 6: Finish import BETA
The Finish import step is the final step in the PMS Integration setup wizard. Here you review your configuration and initiate the initial sync with your PMS.
Review Your Configuration
Before completing setup, review the summary of your configuration:
- Residents to import– Number of residents that will be imported
- Units matched– Number of PMS units matched to Zentra Devices
- Credential types– Mobile credentials enabled/disabled
- Integration settings– Data synchronization and auto-update preferences
- Access provisioning– User groups assigned to all residents
- Automatic sync scheduled– Daily sync time
Completing Setup
- Review the configuration summary.
- ClickStart importto complete setup and begin the initial sync.
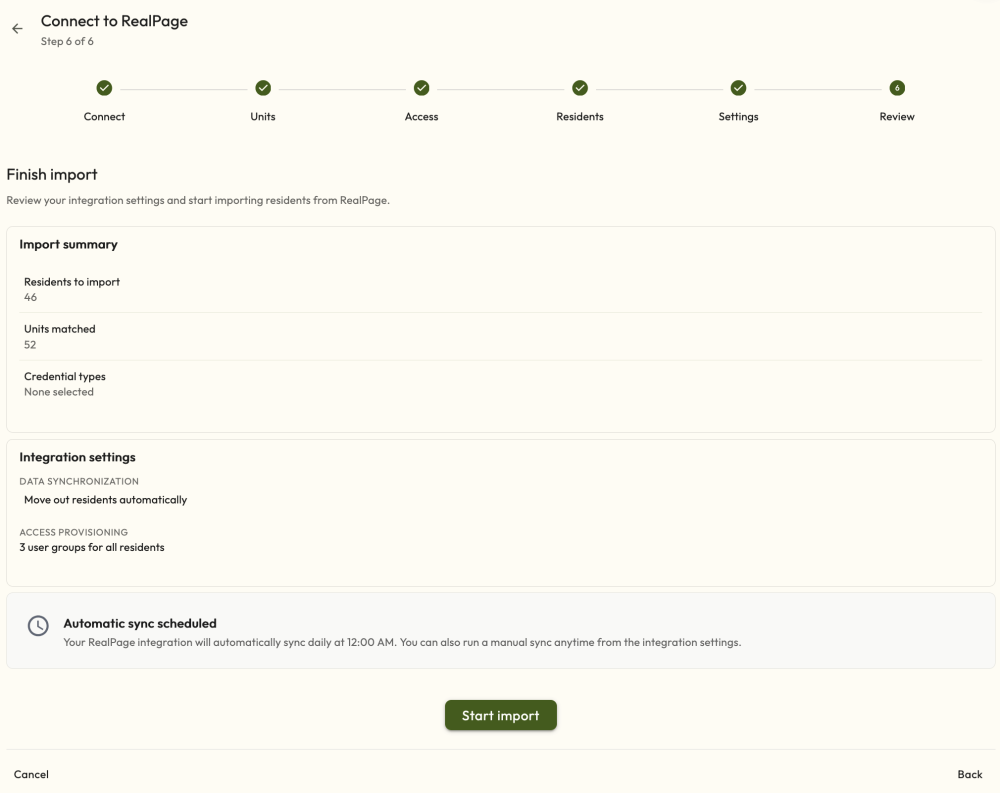
Do not navigate away during the initial import. Depending on the number of residents and units, the initial sync may take a significant amount of time. Subsequent syncs will be much quicker.
Initial Import Behavior
During the first sync, the system:
- Retrieves all active residents from your PMS
- Applies resident matching decisions from the setup wizard
- Creates new resident profiles for unmatched entries
- Routes duplicates and validation errors to the Sync queue
- Assigns default access to all new residents based on your configuration
- Issues mobile and NFC credentials to eligible residents once their lease is active, the same as residents added manually
Viewing Results
After the import completes, you are redirected to view the sync results. This shows:
- Number of residents imported
- Number of residents updated
- Items routed to the Sync queue
- Any errors encountered
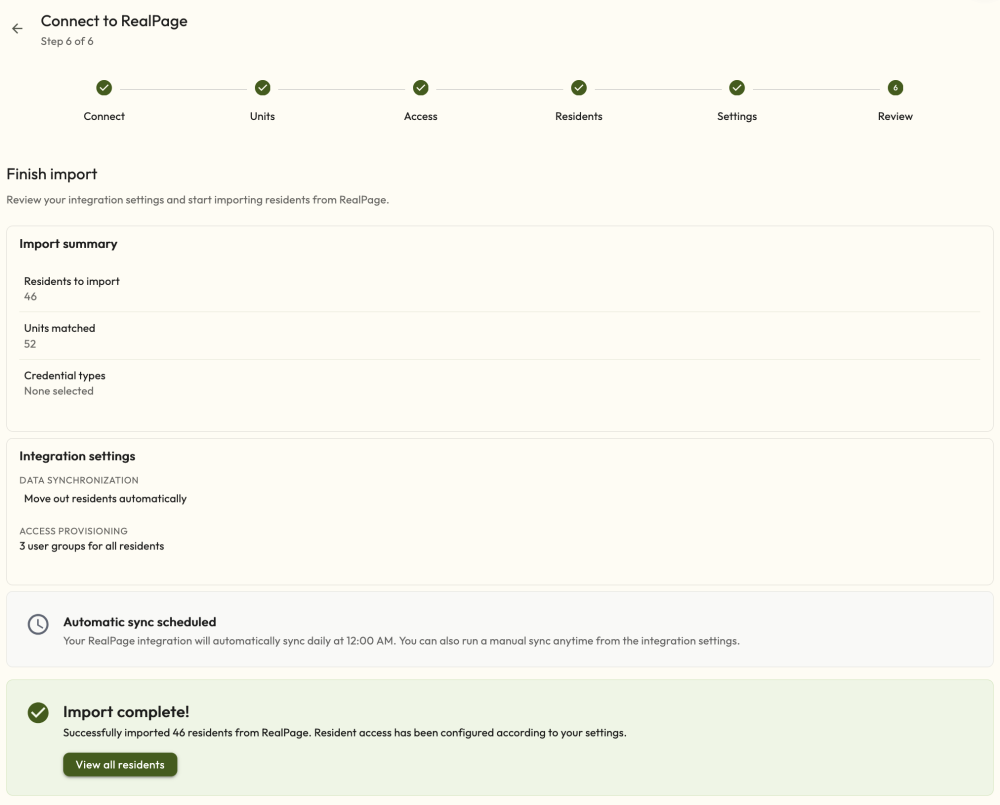
Click
View All Residents
to see the imported users on the People page. Residents synced from PMS display:- Read-only core fields (name, email, phone, unit)
- A PMS indicator showing they are synced
- Assigned User Groups with PMS tooltips
Next Steps
Continue to Daily Sync Operations to learn about manual syncs, automatic scheduling, and monitoring sync status.