
To manage up to 12 readers at once, you can use a “Multiple Access Point” widget. Unlike the Single Access Point widget, this will not show history events.
- Navigate to Home > My First Dashboard, or the name of the dashboard to which you want to add a widget.
![]()
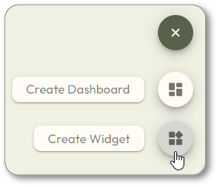
- Hover over
![]() and then choose Create Widget.
and then choose Create Widget.
![]()
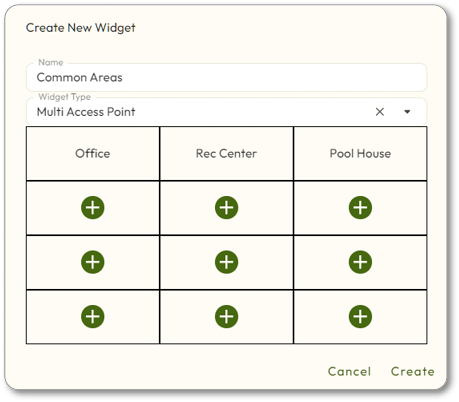
- Enter a name for the widget, and then choose Multiple Access Point from the drop-down menu.
- The screen will change to show a grid of Access Points. To add an Access Point to one of the boxes, click
![]() , and then choose the Access Point from the drop-down box.
, and then choose the Access Point from the drop-down box.
![]()
- Continue adding other desired Access Points to the grid.
- If you want to delete an Access Point from the grid, click on the Access Point and then click
![]() .
. - If you want to edit which Access Point is in a box, click on it and then select the Access Point from the drop-down box.
- If you want to delete an Access Point from the grid, click on the Access Point and then click
- When you are done setting up the grid, click Create.

Control Access Points
You can also control any Access Point in the widget by clicking one or more Access Point(s), choosing an action from the drop-down box in the lower right corner of the widget, and then clicking Send. Access Points that are selected turn green. Clicking on them again deselects them, and they turn back to white.
This is similar to using the Command button.